Sunday, November 24, 2013

Foam Latex

 Defined as "a common material used to construct prosthetics. It involves a latex base, a foaming agent, and a gelling agent. Standard foam latex must be cooked in an oven in order for it to set."  I will not be able to work or experiment with foam latex during my Advanced Makeup course,so instead I did some research and have compiled basic information useful when working with foam latex.

When doing research for various projects I have found the FX Wikia community to have some helpful, concise information. I have also used more books for this project than I normally do, I find that sometimes material and information is hard to find online but books can offer something of a foundation. For my foam latex research I found The Techniques of Three-Dimensional Makeup by Lee Baygan at my university's library. This was the only text that had information about foam latex. 

I have found it somewhat difficult to find precise information as to how to use foam latex because I think a lot of the process is specific to the brand/type of foam latex that you are using and instructions come included with those products, but the Monster Makers have a fairly good step-by-step for making latex masks, but the general concepts are the same. They also sell kits for working with Foam Latex. FX Warehouse is another good source for any/all supplies needed for makeup purposes.

The first step is to make a sculpture out of clay. This can be done on a flat or rounded surface, or you can use a life cast to sculpt on. Monster Makers suggests using oil-based clay (probably because it does not dry out).
The next step is making a mold from the clay sculpture. The first part of this process involves creating a dividing wall around the sculpture; If you are creating a mask that goes all the way around the head, you should pick a place where the mold will split in two. If you are creating a mask similar to the one above you should only need to create a dam for the plaster. 


Once the dams or dividing walls have been created, mix and pour your plaster. You can use industrial gypsum as Monster Makers suggests, or another product of equal durability. When the plaster has fully cured and dried, separate the pieces and clean out the mold, remove any clay that is inside. 


 Then, an optional skin of liquid latex is applied into the mold by coating the mold with latex or by pouring a large amount of latex into the mold and then pouring off the excess.Next, the two pieces of the mold should then be bound together for the pouring process. If you are using a life cast, the "head" should go inside the mold so it can form the inside of the mask. Molds should also be prepped with mold release (specific to your brand of foam) prior to mixing the foam latex. 


The next step, mixing and pouring the foam latex, depends a lot on the specific instructions to the supplies that you are using. I found a PDF of the Monster Makers instructions for pouring/running the foam latex, but again, the instructions will vary from product to product. Once all the parts are carefully measured and/or weighed, mixing can begin. Most sources suggest using an elecrical mixer for better consistency. Finally the molds can be filled. This should be done carefully to make sure the foam runs into all the deepest parts of the mold.  There is an alternative method of injecting the foam into the mold through an escape hole (better for LARGE molds) created during the mold-making process. Once poured, the pieces of the mold should be held together tightly by standing on them or pressing down with your hands while jelling, the first step in the curing process. You will know if your foam has jelled by poking some of the protruding foam with your finger - if your finger leaves a deep impression and no liquid comes out, the foam has jelled. 


Once jelled, most foam latex also requires being baked at a low temperature (Monster Makers says 160 degrees F) to cure although some products such as Kryolan's two-part cold Foam System do not require baking. One source, Makeup FX suggests using an oven that is dedicated to this process and will not be used for food. 


You can also buy foam latex appliances from costume/makeup sources such as The Grimm Brothers, Mostly Dead, and the FX Warehouse.


The application process is similar to the latex, gelatin, and silicone processes I have been working with. The appliances can be glued to the model with various materials including spirit gum, liquid latex, and pros-aide. After the piece is applied, some sources suggest coating the appliance with a thin layer of liquid latex. The piece can then be powdered and makeup can be applied. 

For more information you can search any of the links provided in this post or check out other online sources such as the Stan Winston School of Character Arts which has some helpful videos and tutorials. You can sign up for a free trial before giving money to the program or you can simply buy their dvds or a digital copy of the videos. 


Friday, November 15, 2013

Silicone Rubber

My professor Tom and I decided that working with silicone rubber would be an excellent way to round out my advanced makeup learning experience, so we went and ordered some from Smooth-On, specifically the Dragon Skin FX Pro trial size.  It comes as a two part process, both are clear and goopy.
The instructions are pretty simple, mix equal parts together. This particular product starts to set in about 15 minutes and fully cures in 45 minutes. I excitedly mixed some up and poured a sample amount into a Wilton silicone mold that I bought off Amazon. I tried one bird with mold release (baby oil) and one without. They both came out easily.
While the birds were curing I used the remaining silicone to create a cut on my arm. The material was harder to work with than videos make it out to be. I applied the silicone with a popsicle stick. Once cured, I powdered and applied makeup and a little blood. The makeup did not want to adhere to the silicone, and the blood was even more difficult because the silicone is so resistant to water.
Next I wanted to try out attaching a piece of silicone to skin. I picked out one of the birds and applied it to my arm with pros-aide, coated it with pros-aide, applied makeup, and powdered. By coating the appliance in pros-aide it made it a little bit easier to apply makeup to the silicone.
This makeup stayed on fairly well, but the bird started to peel off after only 30 minutes. The pros-aide does not seem to work very well with the silicone, and the packaging suggests using products such as Skin Tite silicone adhesive or medical grade pressure sensitive adhesives which, according to my research, come as a tape product (can be found here and here and with a basic Google search). The Pros-aide was fine for a temporary situation though, and I will probably continue to use this method. 

Finally, I poured some more silicone into my mold and will be using them next week for a design!


Thursday, November 14, 2013

Guest Makeup and Air Brushing

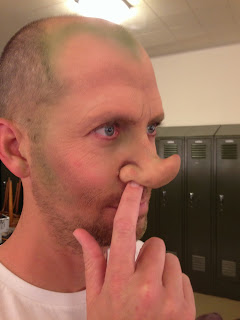
One of my professors, Josh volunteered to have me to apply makeup on him for my class. I was very excited when he offered his time (and face) to me because I had never really worked with a male face for makeup. I struggled with the design process because I didn't have any idea of how to do a masculine makeup. I also had the additional challenge of adding air brushing into the look and the only color I had at my disposal was green. I also had a pre-fabricated Woochie "Pixie Nose" that I wanted to try out - I had never worked with pre-fab prosthetics before.
I began thinking about fairies and the color green. I ended up doing a lot of research on different masculine looks as well as a general google search for male fairies, this search provided me with a lot of art works that ultimately helped me understand how to makeup a male face. I decided on a look that was mostly natural because I want more experience blending prosthetics into skin tone and to achieve smoother edges.
Here is a picture of my professor:
I did this makeup while also giving a lecture to the (beginning) makeup class about prosthetics: the different types and applying them.
I started by applying the nose with pros-aide.
I then did a brief demonstration on air brushing to the class before moving forward with the rest of the makeup.
For this I used a mixture of 50% green Ben Nye liquid makeup and 50% Ben Nye Liquiset. I used a Paasche airbrush similar to this one, but a bit older and it has a few different accessories. I have also experimented with PAX style makeup (liquid makeup mixed with pros-aide), but I don't like it as much because it easily clogs the airbrush and is much harder to remove from skin, but I can see why it would be useful for airbrushing a latex mask or appliance. 
After wiping off the green example, I moved on to applying underpaint, base, and shading on Josh's face. 
I then applied more green airbrushing and stippled highs and lows. 
I also added in some pink tones to bring some life to the nose appliance and some details with wrinkles. 
Here is a close-up of the edges on the nose appliance.
I was super happy with how smooth the edges came out! Overall I was happy with the look and had a great time working on this project. 
Here are some more photos from different perspectives

The edges on the left side weren't as good, but I was still very proud!
I put on the appliance slightly crooked, oops!


A few classmates, when critiquing the look, suggested that I should have taken the green paint farther by making it darker/bolder. I think I agree with them, I was a little hesitant because I didn't want it to be too much.
But as I said, overall it was a great experience. Thanks, Josh!

Sunday, November 3, 2013

Using a Life-Cast & Cyborg Makeup

For my first attempt at creating a makeup with my life-cast face I decided to turn myself into a cyborg.
I started with the plaster face I made during my life-casting session/post.
After doing research into what cyborgs look like I collected some pictures that inspired me. I ultimately settled for creating a look in which something had been applied to my face rather than underneath it. 
My initial design had some flaws that became apparent after sculpting the idea.
First, the nose didn't really make sense; why would the nose-skin have grown over the metal piece? Also, the individual appliances on the face didn't quite make sense together if they were to be controlling me. After some thought and reworking the idea, I came up with this design
Here is the sculpt of the makeup (missing one of the forehead pieces)
and here is the sculpt with all the pieces of wire and bit of mother board embedded into the clay. it is important to embed the pieces before you pour the plaster so that they have a place to go into the latex. This was also a helpful step because all of my wire pieces were pre-cut to the proper length. BUT, take out all the pieces before pouring; you want indentations from the pieces. I also laid all the pieces out on a tray so that I wouldn't mix them up. 
Next, I built dams up around the sculpt. I decided to separate the sculpt into four areas

Once I made sure the clay was sealed onto the face and the walls were thick enough, I coated all the clay surfaces in baby oil as a mold-release. I then mixed and poured the plaster. You can read more about this in my previous post about making molds. 
After allowing the plaster to set for two hours I peeled away the dams. 

All of the parts came away easily and cleanly. I left the plaster pieces to thoroughly dry for a few days. I wanted to use gelatin for the molding process, but having so many parts became overly complicated and messy. I settled for pouring the molding with liquid latex following the steps from my previous post about latex.  Below are all the pieces as they came out of the molds. 
I trimmed the pieces and prepainted them with cream makeup. I powdered the appliances between coats of makeup. I then began gluing the pieces of wire into the latex. This process was a lot harder than I expected it to be. I used pros-aide as glue and I think it would have been better if I used something with a faster drying time such as hot glue. 
 I then began applying the pieces to my face. I started with the nose/forehead piece because its position dictated the position of the rest of the applications due to the wires. I applied the pieces with pros-aide, powdered everything, and then did some touch-up makeup and blended the nose application into my skin. 
Below is a picture from immediately after the makeup was completed. 
And here is a picture from a few hours after wearing the makeup. The chin pieces are starting to come loose due to the large amount of movement in that area.

Overall the makeup stayed on pretty strongly and I like the almost cartoonish feel the look has to it. If I were to do this makeup again I would make sure I hot glued the wires into the makeup and I would make sure the chin pieces were much more secure. 


Supplies:
Face
Clay
Clay tools
Wire pieces and mother board pieces
Baby oil
Plaster
Liquid Latex
Cream Makeup
Makeup brushes and sponges
Pros-aide


Pros-Aide Cream

While shopping around online for a source to purchase pros-aide cream, my professor and I stumbled upon mehandi.com. We were both excited about the idea of doing henna with pros-aide and glitter so we ordered some right away.
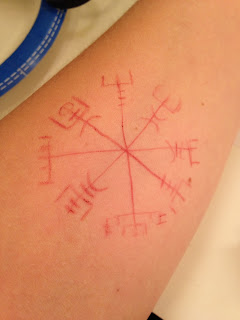
We ordered the large jar of pros-aide cream and four colors of glitter. I used a plastic baggie to "pipe" the pros-aide onto my skin and applied the glitter by tapping the container above my skin. First, I drew on an initial design with a lip liner pencil. 
I then filled my plastic baggie with pros-aide cream. For this I used a piece of paper plate cut into a wedge-shape, but you could use a plastic spoon or other disposable item. 
Then I cut the tip of the baggie with scissors. The first time around I cut it too much and had a large opening, be sure to cut off very little of the tip because you can always make it bigger.
I then began piping the pros-aide onto my arm following the design I drew. This was a difficult step because there is a learning curve (as always) to getting smooth, straight lines. 

After completing each set of lines I wanted for each color, I applied the glitter and then let it dry a little before moving on to the next color. 
I started with purple, then gold, blue, and red. I would suggest doing the darkest colors first just in case the glue isn't fully dry and picks up some of the glitter. Also, apply the glitter over a trash can or something to catch the glitter, it goes everywhere otherwise. 

The above picture was taken once everything was dry. As you can see, I smudged part of it on the right side, and there is still glitter everywhere. The remaining glitter came off easily after about half an hour and the glue had completely set. 
The look lasted for about two full days before parts of it started peeling off.

Below is a photo of the application after two showers and two nights. 

 I ended up peeling the whole thing off rather than using remover because it came off very easily.

Supplies:
Pros-aide cream
Scooper
Plastic baggie
Lip liner pencil
Scissors
Glitter


Thursday, October 24, 2013

Life Casting

Life casting is a fun process, but requires focus and patience. I would recommend learning as much as you can about the process before you begin. I was lucky enough that my professor had done this process before so he was my guide in most of the process. I read the tutorial on life casting in The Prop Builder's Mask-Making Handbook by Thurston James and watched many videos including the following:
Lifecasting Tutorial
Take a Face Cast
It is important to learn as much as you can because many of the steps in life casting rely on acting quickly, the more you are prepared, the better you will handle situations.

First, gather and prep your supplies. For this project my professor and I brought in my good friend Missy to experiment on. Below is the list of supplies that we used in the process. This list can vary based on what is available to you or what items you purchase.
Supplies:
A person to life cast
Vaseline
Swim cap
Garbage bags
Plastic drop cloth
Towels
aprons
clay
Table
Chaise lounge
Fan
Several mixing bowls
cloth strips
Alginate
Cold water
Warm water
Plaster bandages
Cement Plaster

Have one bowl of cold water and one bowl of warm water set out on the table, cut your plaster bandages into strips of various sizes, none should be longer than about 8 inches. I would also recommend scooping the alginate powder into a bowl as prep, too. 
Once your table/room is set up, cut a garbage bag into a poncho for the person being cast. Help them put on a swim cap and then apply vaseline to their eyebrows, eyelashes, any places with peach fuzz, and any places where hairs might be sticking out of the cap. Make sure you work out a system for communication while you are under the cast. For example, thumbs up means "I'm Good." This communication system is helpful because once the alginate is applied, the model cannot move their face. Also, if the model gets uncomfortable at any time inform them that they can simply sit up and remove the products from their face. Here is a photo of me all prepped. We covered the chaise lounge with a plastic drop cloth as well. 
Once the person is prepped, you can begin mixing the alginate. Use COLD WATER for this; cold water slows the curing process. As you begin applying, it is important to constantly inform the person being cast of what is happening. Tell them every step you are following so that nothing is a surprise to them. Also, having someone talk to you is comforting and keeps your mind off of the fact that your face is buried under alginate and plaster. Constantly ask them if they are doing well, look for the thumbs up!
Our alginate was a little runny and messy. Make sure you leave the nostril area open so the model can breathe. You can do this by carefully working the alginate around the area or by inserting straws into the nostrils. We went with the first method as per suggestion of my professor. 
 For the first application (on Missy) we used water that was too warm and the alginate set up too quickly. Below you can see that the alginate got too chunky toward the end. This ultimately set up the cast to be rather unsuccessful. We came out with a workable product, but its far from perfect
We added cloth strips around the face while the alginate was curing in the hopes that it would help the plaster bandages adhere to the alginate better. This didn't work as well as planned.
After the alginate sits for a few minutes you can begin applying the plaster bandages. Again, be careful around the nose area. Once the mask is taken off the nose area can be covered with another plaster bandage or with more alginate.
Continue to talk to your model during this process! Keep them company by sharing stories with them, but keep the joking and laughing to a minimum so their face doesn't move. 

After allowing the plaster bandages to cure (this process can be sped up slightly by having a fan blow toward the model) have the model put their hands on the mask and sit up. Have the model move their face around to release the alginate while you work the alginate away from their neck. 
I suggest simply pulling off the swim cap at this point and removing it from the alginate after the model is free from their mold. 

Here are the two molds we created. As you can see the mask for Missy got torn and a little messed up because of the alginate. 

My mask came out pretty good except for a few air bubbles!

Plug the nose holes with a little clay and then cover with plaster bandages. You can then begin mixing the plaster you will pour into the mold. 
We used hydro-stone. My professor and I had never worked with this product before so we were both surprised by some of its properties. When mixed, this product is very watery. We continued to add more powder to the mixture and it remained watery. Once left to sit for a few minutes this product almost instantly turns to stone. There is no in-between stage where the plaster can be shaped or molded the way that some other products I have worked with can. Once hardened, the plaster is very hard and very warm. I would not recommend using this product directly against your skin for a casting project. 

Above you can see Missy's face. There are some imperfections from the alginate and the tip of the nose got sheared off. 

Above is Tom cleaning off some of the imperfections from air bubbles on my face. 

Here are the finished faces again, ready to be sculpted on!

Once the faces were completely dry I applied a layer of spray sealant for a smoother surface to work on

This process was enjoyable over all and being cast was very different than I expected it to feel. When the cold alginate was applied to my face it made me very cold overall. I can certainly understand why this process might not work for some people because being under all those materials can feel very claustrophobic. It was also hard to not be able to chime into the conversations that were happening around me. Breathing was not an issue at all even though I had a cold. 

If you are going to embark on this project be sure to read and learn as much as you can, and be as prepared as possible!

Thanks again to Missy for helping with this project :)