
Lifecasting Tutorial
Take a Face Cast
It is important to learn as much as you can because many of the steps in life casting rely on acting quickly, the more you are prepared, the better you will handle situations.
First, gather and prep your supplies. For this project my professor and I brought in my good friend Missy to experiment on. Below is the list of supplies that we used in the process. This list can vary based on what is available to you or what items you purchase.
Supplies:
A person to life cast
Vaseline
Swim cap
Garbage bags
Plastic drop cloth
Towels
aprons
clay
Table
Chaise lounge
Fan
Several mixing bowls
cloth strips
Alginate
Cold water
Warm water
Plaster bandages
Cement Plaster
Have one bowl of cold water and one bowl of warm water set out on the table, cut your plaster bandages into strips of various sizes, none should be longer than about 8 inches. I would also recommend scooping the alginate powder into a bowl as prep, too.
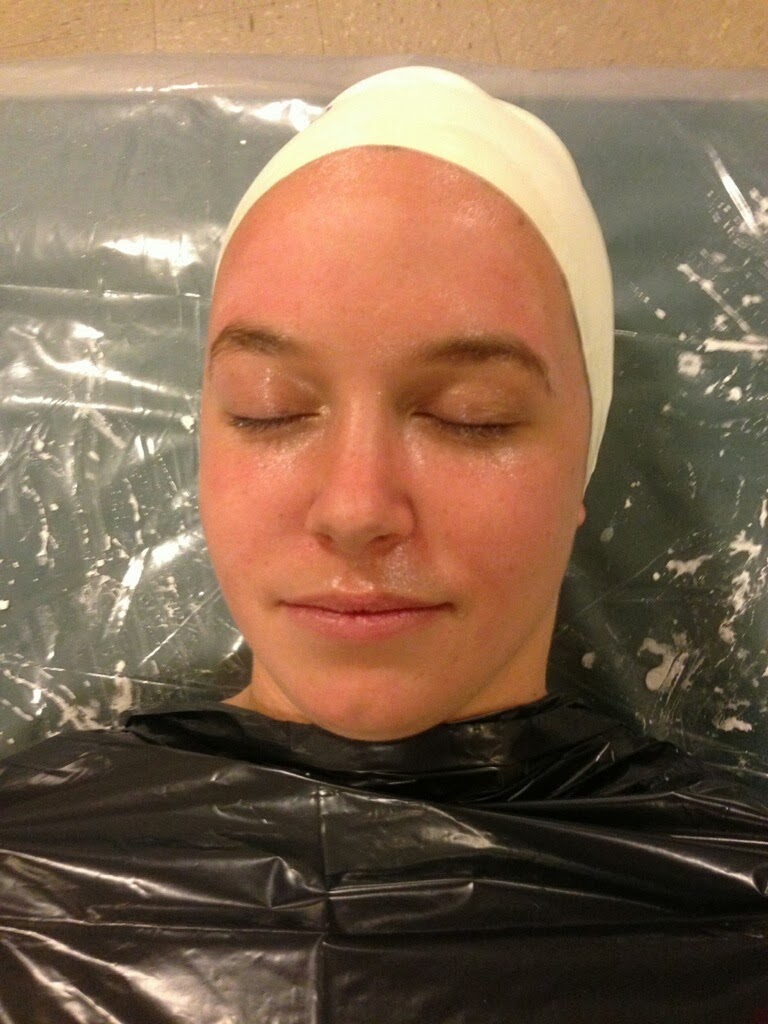
Once your table/room is set up, cut a garbage bag into a poncho for the person being cast. Help them put on a swim cap and then apply vaseline to their eyebrows, eyelashes, any places with peach fuzz, and any places where hairs might be sticking out of the cap. Make sure you work out a system for communication while you are under the cast. For example, thumbs up means "I'm Good." This communication system is helpful because once the alginate is applied, the model cannot move their face. Also, if the model gets uncomfortable at any time inform them that they can simply sit up and remove the products from their face. Here is a photo of me all prepped. We covered the chaise lounge with a plastic drop cloth as well.

Our alginate was a little runny and messy. Make sure you leave the nostril area open so the model can breathe. You can do this by carefully working the alginate around the area or by inserting straws into the nostrils. We went with the first method as per suggestion of my professor.

For the first application (on Missy) we used water that was too warm and the alginate set up too quickly. Below you can see that the alginate got too chunky toward the end. This ultimately set up the cast to be rather unsuccessful. We came out with a workable product, but its far from perfect

After the alginate sits for a few minutes you can begin applying the plaster bandages. Again, be careful around the nose area. Once the mask is taken off the nose area can be covered with another plaster bandage or with more alginate.

Continue to talk to your model during this process! Keep them company by sharing stories with them, but keep the joking and laughing to a minimum so their face doesn't move.

After allowing the plaster bandages to cure (this process can be sped up slightly by having a fan blow toward the model) have the model put their hands on the mask and sit up. Have the model move their face around to release the alginate while you work the alginate away from their neck.

I suggest simply pulling off the swim cap at this point and removing it from the alginate after the model is free from their mold.

Here are the two molds we created. As you can see the mask for Missy got torn and a little messed up because of the alginate.

My mask came out pretty good except for a few air bubbles!

Plug the nose holes with a little clay and then cover with plaster bandages. You can then begin mixing the plaster you will pour into the mold.

We used hydro-stone. My professor and I had never worked with this product before so we were both surprised by some of its properties. When mixed, this product is very watery. We continued to add more powder to the mixture and it remained watery. Once left to sit for a few minutes this product almost instantly turns to stone. There is no in-between stage where the plaster can be shaped or molded the way that some other products I have worked with can. Once hardened, the plaster is very hard and very warm. I would not recommend using this product directly against your skin for a casting project.

Above you can see Missy's face. There are some imperfections from the alginate and the tip of the nose got sheared off.

Above is Tom cleaning off some of the imperfections from air bubbles on my face.

Here are the finished faces again, ready to be sculpted on!
Once the faces were completely dry I applied a layer of spray sealant for a smoother surface to work on
This process was enjoyable over all and being cast was very different than I expected it to feel. When the cold alginate was applied to my face it made me very cold overall. I can certainly understand why this process might not work for some people because being under all those materials can feel very claustrophobic. It was also hard to not be able to chime into the conversations that were happening around me. Breathing was not an issue at all even though I had a cold.
If you are going to embark on this project be sure to read and learn as much as you can, and be as prepared as possible!
Thanks again to Missy for helping with this project :)
Really a great addition. I have read this marvelous post. Thanks for sharing information about it. I really like that. Thanks so lot for your convene. alginate
ReplyDelete