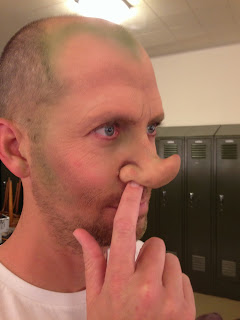
I began thinking about fairies and the color green. I ended up doing a lot of research on different masculine looks as well as a general google search for male fairies, this search provided me with a lot of art works that ultimately helped me understand how to makeup a male face. I decided on a look that was mostly natural because I want more experience blending prosthetics into skin tone and to achieve smoother edges.
Here is a picture of my professor:
I did this makeup while also giving a lecture to the (beginning) makeup class about prosthetics: the different types and applying them.
I started by applying the nose with pros-aide.
I then did a brief demonstration on air brushing to the class before moving forward with the rest of the makeup.
For this I used a mixture of 50% green Ben Nye liquid makeup and 50% Ben Nye Liquiset. I used a Paasche airbrush similar to this one, but a bit older and it has a few different accessories. I have also experimented with PAX style makeup (liquid makeup mixed with pros-aide), but I don't like it as much because it easily clogs the airbrush and is much harder to remove from skin, but I can see why it would be useful for airbrushing a latex mask or appliance.
After wiping off the green example, I moved on to applying underpaint, base, and shading on Josh's face.
I then applied more green airbrushing and stippled highs and lows.
I also added in some pink tones to bring some life to the nose appliance and some details with wrinkles.
Here is a close-up of the edges on the nose appliance.
I was super happy with how smooth the edges came out! Overall I was happy with the look and had a great time working on this project.
Here are some more photos from different perspectives
The edges on the left side weren't as good, but I was still very proud!
I put on the appliance slightly crooked, oops!
A few classmates, when critiquing the look, suggested that I should have taken the green paint farther by making it darker/bolder. I think I agree with them, I was a little hesitant because I didn't want it to be too much.
But as I said, overall it was a great experience. Thanks, Josh!


No comments:
Post a Comment